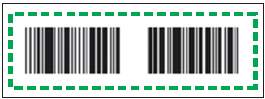
Barcode Separator/Index
The Barcode Separator/Index connector analyzes a barcode contained in a scanned document and saves it as metadata. Also, it can divide the document into separate files starting with the page that contains the same barcode.
This connector can only be added to a workflow whose [Job Processing Location] is set to [On Server].
Supported formats (input data)
- TIFF
- TIFF-F
- DCX
- BMP
- JPEG
- PNG
- GIF
A barcode contained in a PDF or other application data cannot be recognized. When data in an unrecognizable format is input, an error occurs and the job is terminated regardless of the [Error Handling] setting.
When a file in an unsupported format is entered, error code 53260015 and the message "Failed to create list of barcode properties information included in images" are recorded in the system log.
Recognizable barcode types
The following barcode types are recognizable by the Barcode Separator/Index connector:
|
1D barcodes |
2D barcodes |
|---|---|
|
|
|
|
|
|
|
|
|
|
|
|
|
|
|
|
|
|
This function scans and recognizes only the barcode on the first page in the first section of a scanned document. Barcodes on the second page or later in the first section or on the pages in the second section or later are not scanned. However, when [Continue Recognition Even When 1st Page Has No Barcode] is enabled in [General Settings], barcodes on the second page or later in the first section or on the pages in the second section or later are scanned.
Barcodes in skewed images and barcodes that are reversed, at an angle, or at a right angle can be detected and scanned.
- Obtained barcode data can be delimited based on a preset format.
- Data obtained by delimiting can be stored as custom metadata.
- The obtained metadata can be used for processing with another SLNX connector.
- The tag name can be specified when the information is stored as metadata.
Dividing a Job for Processing
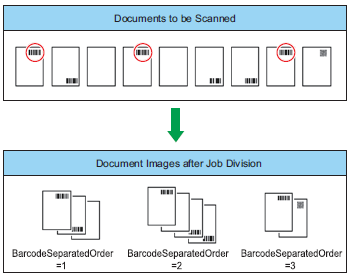
Normally, when you scan a multiple page document, all pages are handled as one job. The job division function of the Barcode Separator/Index connector can be used to divide a multiple page document and process it as multiple jobs.
When the job division function is used, each time the same barcode is scanned, the document is divided into a separate file starting with the page that contains the barcode.
In this example, a nine-page document is scanned, and the job is divided by the same barcode that is located at the specified position at the top right. There are three barcodes of the same value at the same specified location at the top right, and the nine-page document is divided into three jobs starting on the page containing the specified barcode.
To each of the three jobs, a metadata "BarcodeSeparatedOrder", which indicates the order of division, is added. "1" is assigned to the first job after division, and "2", "3", ..., to subsequent jobs. When using the division order for the file name, for example, obtain and embed this metadata. If the document cannot be separated by a barcode, the separated order is not added to the metadata.
When [File Naming Rules] is specified as {name}_{BarcodeSeparatedOrder:N03}, the file names will be as follows:
20210421120000_001.tif
20210421120000_002.tif
20210421120000_003.tif
Refer to Automatic File or Folder Naming for general file naming information.
Precautions on document orientation
The Barcode Separator/Index connector does not identify the top and bottom of the scanned document. Be sure to place the document in the correct orientation. For details about placing the document, refer to the user's guide of the device being used.
Depending on the orientation of the document, the position of the barcodes in the actual document may not match the position and coordinates of the barcode in the data scanned as an image.
To perform barcode recognition, register the barcode information for each barcode on the properties window of the Barcode Separator/Index connector. The registered settings are displayed in the list on the barcode information management window.
To configure the properties of the Barcode Separator/Index connector:
-
In the Delivery Flow, click the [Barcode Separator/Index] connector icon.
-
Specify Display Name.
-
In [Barcode Configuration], click [Add].
To edit the registered information, click [Edit].
To delete registered information, select the information to delete, click [Delete], and select [Yes] on the confirmation window that appears.
-
In the General Settings screen, configure the following settings to add the registered barcode information:
Option
Description
Use barcode to perform batch separation
Enable to use the barcode as the symbol for job division:
-
Perform batch separation when the barcode data match: Select this option to compare the barcode data with an arbitrary string, and if they match, use the barcode as the symbol for job division. In [Barcode data], enter the string to compare with the scanned barcode data.
-
Do not include the barcode sheet in the separated document: Select this option to delete the sheet containing the barcode when using the barcode as the symbol for job division
Continue Recognition Even When 1st Page Has No Barcode
-
Select this option to specify barcodes on the second page or thereafter or in the second section or thereafter as the target for recognition if there is no barcode on the first page or it cannot be recognized.
-
Clear the check box to not recognize the barcodes on the second page or thereafter or in the second section or thereafter if there is no barcode on the first page or it cannot be recognized
Selection Method
Choose a method to identify the barcode uniquely for recognition:
-
Do not Specify: The barcode for recognition is not uniquely identified
-
Barcode Number: Adds a number to all barcodes on the page according to the number designation rule. You can use that number to identify the barcode for recognition. In [Position], enter a barcode number from 1 to 99. Refer to Specify Barcode Numbers below.
-
Coordinates: Recognizes the barcode at the specified coordinates. Refer to Measure the Barcode Area Coordinates below for measurement instructions.
-
Rectangular Area: Recognizes the barcode within a specified area. Refer to Measure the Rectangular Area below for measurement instructions.
To recognize a barcode, only one whole barcode must be included in the specified area. Configure the area with some margin because a partial barcode is not recognizable. If there are other barcodes nearby, it is recommended to use Barcode Number as the selection method.
Barcode Type
Choose one type of barcode from the following supported options: Code39 Standard ASCII, Code39 Extended ASCII
Code 128 / GS1(EAN)-128, EAN 8, EAN 13, Interleaved 2 of 5
Codabar(NW7), Code 2 of 5, Codabar(NW7), PDF417, DataMatrix, QR
Data Format
Choose the format of data stored in the barcode:
-
Non-delimiter Type: Select this option when the data stored in the barcode is separated over multiple pages or when not dividing the data stored in the barcode over multiple pages.
-
Delimiter Type: Select this option when the format of data stored in the barcode is divided by an arbitrary delimiter character. The data obtained from the barcode is divided by the delimiter character entered in [Delimiter Rule] and separated into multiple pages. The characters that can be specified as delimiter characters are as follows: [a-z] [A-Z] [0-9] "#$%&'()*+,-./:;<=>?@[]A '{I}
-
Digit Type: Select this option when the format of data stored in the barcode is divided by the number of characters. The data obtained from the barcode is divided by the number of characters entered in [Delimiter Rule] and separated into multiple pages.
-
Enter the number of digits separated by commas in the format "1,2,3,4". For example, when the barcode data is "123xx789yyy" and you want to divide the data into individual pages using the units "123", "xx", "789", and "yyy", specify "3,2,3,3". You can use an asterisk (*) when entering the number of digits. The asterisk means "all strings thereafter".
Character Encoding
Choose the character code used in the barcode. Options include ASCII, Latin 1, JIIS, Windows Shift JIIS, UTF-8
Error Handling
Select a method to handle any errors that occur during barcode registration when the connector is processing a job:
-
Stop the job when barcode filter fails: Ends the job when a barcode cannot be detected or reading of the detected barcode data or division of the data fails.
-
Ignore error and continue the job: Continues the job without ending when a barcode cannot be detected or reading of the detected barcode data or division of the data fails. Data read from a barcode, however, cannot be added as metadata. A warning log is recorded in the log.
Tag Name
Specify a tag name when analyzing data read from a barcode and storing it as metadata. For the tag name of custom metadata, the string specified in [Tag Name] is given the prefix "P0001" and the suffix " " (underscore) followed by a serial number between 1 and 99.
Example of metadata tag name: Metadata name added to the document when the string "DOC" is specified in [Tag Name]
P0001 DOC 01
P0001 DOC 02
P0001 DOC 03...
- When a tag name is not specified, the string "bcData" (default value) is used.
- Do not use curly brackets ({ }) in the tag name.
- Do not use an existing tag name.
-
-
Click [OK] to return to the Barcode Configuration tab.
-
On the Properties window, register the barcode information.
When you use the job division function, the settings on the Properties window are used as the barcode information for job division.
-
Click [OK].
Depending on the setting of [Continue Recognition Even When 1st Page Has No Barcode], the value of LastResult_Barcode recorded in the metadata is as follows:
|
|
Barcode on the first page |
No barcode on the first page |
|---|---|---|
|
When the check box is selected |
Success |
Success |
|
When the check box is cleared |
Success |
Error |
Specify Barcode Numbers
When [Barcode Number] is selected in [Selection Method] on the Properties window, consider the following points:
- The top left corner of the scanned image is defined as coordinate (0,0).
- Determine the order by the coordinates of the upper left corner of each barcode.
- Compare the X coordinates, and order them starting with the smallest coordinate.
- When the X coordinate values are the same, order them starting with the smallest Y coordinate value.
Assign numbers, as shown below, according to the number of specified barcode types.
- When only one barcode type is specified: Assign numbers only for barcodes of the specified type.
- When multiple barcode types are specified: Assign numbers for barcodes of all specified types.
- When the barcode type is not specified: Assign numbers to all barcodes.
- Example of barcode number specification
The following figure shows an example of the number specification when four barcodes are located on one page.
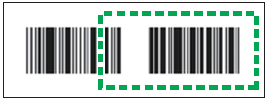
Measure the Rectangular Area
When [Rectangular Area] is selected in [Selection Method] on the Properties window, you must then specify the Width, Height and Position. The upper-left corner of the original becomes the base (0, 0) coordinate.
Measure the following:
-
The X-direction length of the area width. Enter this value in the Width field.
-
The Y-direction length of the area height. Enter this value in the Height field.
-
The X/Y-direction length through the upper-left corner of the area. Enter these values in the Position field, separated by a comma.
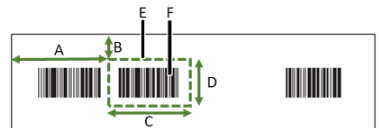
The following example shows how the rectangular area of the upper-center barcode is specified when there are four barcodes on one page.
A = Measure as the x-coordinate
B = Measure as the y-coordinate
C = Measure as the width
D = Measure as the height
E = Specified Area
F = Target barcode
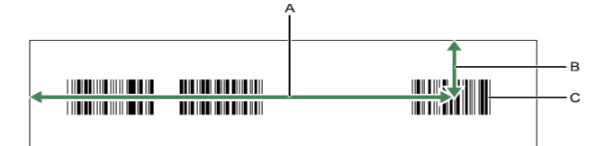
Measure the Barcode Area Coordinates
When [Coordinates] is selected in [Selection Method] on the Barcode Configuration window, you must then determine the coordinates. The upper-left corner of the original is the base (0, 0) coordinate.
-
Measure the X/Y-direction length through the approximate center of the barcode.
These distances are the coordinates of your barcode. Enter the coordinates in the order of X, Y in the "Position" field (separated by a comma). You can select "mm" or "inch" as the units for the coordinates. 4 digit integer and 2 digit decimal are acceptable. The value range is from 0 to 1189 or 1189.00.

The following illustration shows how the coordinates of the upper-right barcode are measured when there are four barcodes on one page.
A = Measure as the x-coordinate
B = Measure as the y-coordinate
C = Target barcode
When there is only one complete barcode in the area, the barcode can be recognized.
When the area is specified as shown below, only the complete barcode in the area on the right can be recognized.
When the area is specified as shown below, because there is no complete barcode in the area, no barcode is recognized.
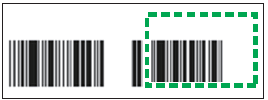
When the area is specified as shown below, no barcode is recognized because more than one complete barcode is contained in the area.